
Task scheduling is used for scheduling jobs to run on a server. There may be situations where developers need to execute tasks regularly or at different intervals, which may be cumbersome. For instance, daily database backup, system maintenance, downloading files and sending work reports at regular intervals. Replacing these tremendous tasks and utilizing more server resources, that’s where task scheduling comes in. In this article, we will see how to schedule emails in Node.js using node-mailer and node-cron.
Create a new NodeJS application and install the required dependencies.
mkdir node-email-scheduler
cd node-email-scheduler
npm init
npm install --save node-cron node-mailer express
The node-cron module is a tiny task scheduler in pure JavaScript for Node.js based on GNU crontab. Nodemailer is a module for Node.js applications to allow easy email sending.
Building out the Basic Server
Enter the following command in your terminal to create the file index.js in your project directory.
touch index.jsCreate a simple express server with the following code in your index.js file.
const express = require('express'),
      app = express(),
      nodemailer = require('nodemailer'),
      cron = require('node-cron'),
      PORT = 3000

app.listen(PORT, () =>
    console.log(`Server is Listening on ${PORT}`)
)
Here we are importing the required packages, instantiating an express app and starting the server on port 3000. Our express server is all set up! We can start our server by running this command:
node index.jsSetting up Scheduler
What is Cron: Cron is a time-based job scheduler, which is used to automatically schedule jobs to run periodically at fixed times, dates, or intervals. Since Cron is best suited for scheduling repetitive tasks.
CRON Jobs are the most commonly used method to automate tasks on the server.
For example, if you want to send an email work report to all the employees in your organization every day at 7 pm, create a function work_report_email() inside the cron function. It will send emails without any
intervention.
In this this article, we’ll see how to schedule jobs.
How it works?
The actions of a scheduler are defined by a crontab (cron table) configuration that looks like this:
Scheduling the task
Import the node-cron module:
const cron = require('node-cron')
Take a look at the following example.
import * as cron from 'node-cron'
cron.schedule(' */10 * * * * ', () => {
  console.log('running a task every 10 minutes');
});
The asterisks (*) , which are highlighted, are the time specifications that tell the scheduler when to execute the task that is in the callback function. Here we will see the “running a task every 10 minutes” printed to the console in every 10 minutes when the Cron gets executed. The expressions are represented by five asterisks, with the sixth being optional.
Example 1: Creating a cron expression to run a task in every seconds.
Expression: * * * * * * (using 6 stars instead of five)
Example 2: Creating a cron expression to run a task in every 15 minutes.
Expression: 15 * * * *
Example 3: Creating a cron expression to run a job at 12:00 Am every day
Expression: 0 12 * * *
Here you’ve successfully implemented your scheduler job which, will run every ten minutes. We’ll now add the logic to send emails in our application.
Creating the Email Function
Let’s create the function that will send emails. First, import the node-mailer module:
const mailer = require('nodemailer');Nodemailer uses a transport service which it can send emails. To create a transporter that will send mail, use the createTransport () function. Nodemailer uses a transport service that which can send emails.I’m using the Gmail service in this example.
// Creating a transporter
const transporter = mailer.createTransport({
 host: 'smtp.gmail.com',
 port: 587,
 auth: {
  user: 'your-username',
  pass: 'your-password'
 }
});
Now we need a second configuration object where we will be configuring our email details.
const emailData = {
from: 'youremail@gmail.com' // sender address
  to: 'test@gmail.com', test2@gmail.com // list of receivers
  subject: 'Sending Email from Node.js Application',
  text: 'That was easy!'
  html: '<b>Hey there! </b>
         <br> This is our first message sent with Nodemailer <br/>',
};
The next step is sending email by using the sendMail method provided by the transporter object we created above.
transporter.sendMail(mailOptions, function (err, info) {
if(err)
console.log(err)
else
console.log(info);
});
SendMail method takes two arguments: mailOptions and a callback function. If the email is successfully sent, a response will be received in info.response; otherwise, an error will occur. Before sending an email, go to the settings page and enable the allow non-secure apps to access the Gmail account option.
And that’s how we send emails in NodeJS application.
Emails From the scheduler
cron = require('node-cron');

// email message options
const mailOptions = {
    from: 'myemail@gmail.com',
    to: 'testemail@zweck.io',
    subject: 'Email from Node App : A Test Message',
    text: 'Hello From Node!'
}
cron.schedule('* * * * * *', () => {
    // Email Transport Configuration
    const transporter = nodemailer.createTransport({
        service: 'gmail',
        auth: {
            user: 'myemailuser@gmail.com',
            pass: 'mypassword'
        }
    });
    // send email
    transporter.sendMail(mailOptions, (error, info) => {
        if (error) {
            console.log("error:", error);
        } else {
            console.log('Email Send:' + info.response);
        }
    });
});
Run the server again and see the emails send in every 10 minutes.
Message from the terminal:
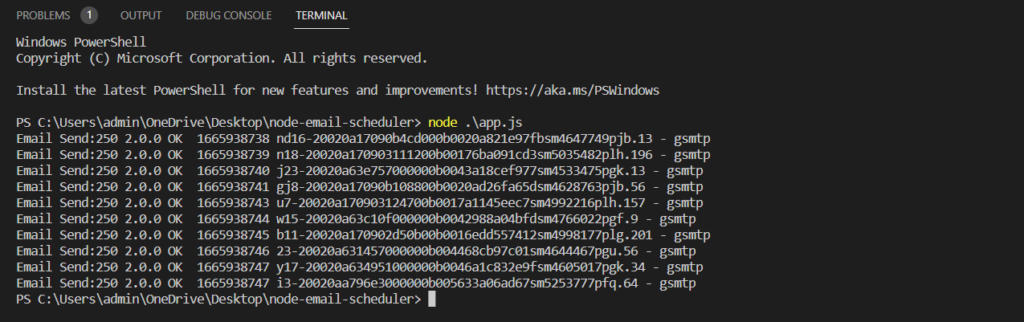
Conclusion
Congratulations!!! You have done it successfully. We just successfully send mail using node-cron and node-mailer. Instead of sending in a ten-minute interval, we can configure the time and logic as per your application’s requirements.
I hope you enjoyed my first article, and if you have any suggestions, please let me know.
Thank you, guys. Have a nice day
Leave a Reply