
Introduction:
The first question that comes to our mind when we hear about unit testing is why developers should use unit testing. Now we will know more details about unit testing and build a prototype of unit testing for REST API using MOCHA, CHAI which is written in Typescript. Also, test coverage of the test cases and develop a coverage report using NYC.
Why is unit testing important?
Unit testing is an essential factor in the software development process and it’s done so that the maintenance, enhancement, and updates can merge easily. It’s a method that is used to test functions and applications to meet the requirements and expectations of the client. Mostly the unit test scripts were written by the developer itself. Depending on how much assertions are satisfied in the unit testing, that much clarification about the functions and application behavior will help the next developers who have been involved in it.
Advantages of Unit testing
The merits and advantages of implementing the unit testing for developers is listed as :-
- can separate a part of any code.
- Can check whether the written code is correct or not.
- A thorough check through the functionality.
- Easy for debugging and bug fix, also reduces time, money, and energy.
- Helps reusability for future development.
Stepping into Unit testing
Introduce briefly and listing the steps that we will learn here:
- Create a project in typescript using node js and run it using tsc.
- Server creation and MongoDB connection.
- Creation of a prototype of a perfect structured project which contains REST APIs(CREATE, READ, UPDATE and DELETE).
- Introducing the development of unit testing using mocha and chai
- Developing scriptlet for test coverage report using nyc package.
Before starting learning as a prerequisite you should know about the importance of typescript and the work behind the execution of a typescript function(for easier refer:- https://zweck.io/better-programming-using-typescript-with-node-js/).
BDD and TDD Methods
Says about the definition of these unit test development behavior, BDD(Behavior Driven Development) and TDD(Test Driven Development) .BDD means creating an executable specification that fails because the feature doesn’t exist, Then write the simplest code that can pass the spec. Repeat this until the release candidate is ready to ship.
And TDD means writing a test that fails due to the absence of specific functionality. After that, write a simple code that can pass the test. Then refactor to remove duplication etc. And this Red-Green-Refactor loop should repeat until you get a complete feature.
Let’s begin
To Set up a project environment in node js the PC must install the required version of node(v16 or higher) Create a folder named Project1 and then open the command prompt. Run the command “npm init -y” then we can see that a file called package.json is created. Open Visual studio code to see the file structure.
Now we can start the coding session.
{
  "name": "project1",
  "version": "1.0.0",
  "description": "",
  "main": "index.js",
  "scripts": {
    "test": "echo \"Error: no test specified\" && exit 1"
  },
  "keywords": [],
  "author": "",
  "license": "ISC",
  "dependencies": {
    "express": "^4.18.1"
  }
}
Our next target is to create a typescript file for server creation. All of the APIs we create in ts and it’s in a server that has a port of 3000. The file should be inside a folder. Here we name the folder as src and it contains a ts file for server creation.
In the src folder, create a ts file and name it app.ts. This ts file will be executed and forms a server with the help of express.js. To build a scriptlet for creating a server we must install express,bodyparser packages. Cors is used to access the APIs from other applications.
These dependency packages were automatically saved in a folder named node_modules. And it’s done by running the installation command in vs code terminal. The installation command is shown below :-
npm install --save expressThen we write code to create a server in the node. The installed dependency packages will be imported as shown in the figure below.
/*importing the required modules for server creation and
other depending functionalities like DBconnection and router*/
import express from "express";
import apiRouter from "./routes/apiRouter";
import { initializeDb } from "./database/database";
import bodyParser from "body-parser";

export const app = express();
const port = 3000;
const http = require("http").createServer(app);

app.use(bodyParser.urlencoded({ extended: false })); // parse application/x-www-form-urlencoded
app.use(bodyParser.json()); // parse application/json

app.use("/api", apiRouter); // for containing and redirecting to router.ts which contains all APIs

initializeDb(); // for initialize the connection to database
http.listen(port, () => {  //creating a server port listening in 3000
    console.log("Server Started!")
});
export default app;
To run this code we have to make some changes in the package.json file. And also create a tsconfig.json. The mentioned tsconfig.json file will be generated by running the command “tsc –init”. The project will be in working condition only if both of these JSON files are present. In package.json, write a new property in script “start” as key and “node ./dist/app.js” as value. And also make changes in tsconfig.json file as given below. Define the rootDir & outDir in tsconfig file rootDir must contain the path of the folder which contains the ts files. And the outDir should be a path for generating a folder that contains js files which are interpreted from ts to js and the interpretation was done by the globally installed tsc.
{
  "compilerOptions": {
    "target": "es2016",
    "module": "commonjs",
    "rootDir": "./src", /* Specify a file that bundles all outputs into one JavaScript file.
    If 'declaration' is true, also designates a file that bundles all .d.ts output. */
    "outDir": "./dist", /* Specify an output folder for all emitted files. */
    "esModuleInterop": true, /* Emit additional JavaScript to ease support for importing CommonJS modules.
     This enables 'allowSyntheticDefaultImports' for type compatibility. */
    "forceConsistentCasingInFileNames": true, /* Ensure that casing is correct in imports. */
    "strict": true, /* Enable all strict type-checking options. */
    "skipLibCheck": true /* Skip type checking all .d.ts files. */
  }
}
By running the command “npm start”, it will execute the app.js file in the dist folder. But the dist folder is not created yet.
So we can use an inbuilt script of package.json It’s “prestart”. While running npm start it will check whether the prestart was there.
Here we use a “build” key in the script and implement it in “prestart”. The value of the build keyword is “tsc” as in the above figure.
Now we can run npm start in vscode it will compile the ts code in src file..
Creating routes
We can create so many routes for creating APIs using the router() function of express. To list out and manage the required route we have to create a routes.ts in src folder and it seems like
/*importing the required modules and exported functions from a controller file*/
import express from "express";
const router = express.Router();
import { getAllProduct, getOneProduct, saveProduct, updateProduct, deleteProduct } from "../controller/mainController";

router.get("/products", getAllProduct);// api route for getting all products details from database
router.get("/products/:_id", getOneProduct);// api route for getting one product details from database
router.post("/products", saveProduct);// api route for saving a product details into database
router.put("/products/:_id", updateProduct);// api route for a product details by it's id from database
router.delete("/products/:_id", deleteProduct);// api route to delete a product from database

export default router;
Also from the above figure, it’s clear that the methods get, post, put, and delete were used to do the appropriate actions for crud. Here we can see some variables like getAllproducts, getOneProduct etc .from a controller file, and it’s called within a router function as an extension of routes. These functions will lead to needed services that are used for CRUD operation in MongoDB. And the controller file which contains the mentioned functions will seem as
import { Request, Response } from "express";
import { fetchAllProduct, fetchOneProduct, createProduct, updateOneProduct, deleteOneProduct } from "../services/products.service";

export const getAllProduct = async (req: Request, res: Response) => {
    try {
        const response = await fetchAllProduct();
        res.status(200).json(response);
    } catch (error) {
        res.status(500).json(error)
    }
}
export const getOneProduct = async (req: Request, res: Response) => {
    try {
        const { _id } = req.params;
        const response = await fetchOneProduct({ _id });
        res.status(200).json(response);
    } catch (error) {
        res.status(500).json(error)
    }
}
export const saveProduct = async (req: Request, res: Response) => {
    try {
        const data = req.body;
        const response = await createProduct(data);
        res.status(200).json(response);
    } catch (error) {
        res.status(500).json(error)
    }
}
export const updateProduct = async (req: Request, res: Response) => {
    try {
        const { _id } = req.params;
        const data = req.body;
        const response = await updateOneProduct({ _id, data });
        res.status(200).json(response);
    } catch (error) {
        res.status(500).json(error)
    }
}
export const deleteProduct = async (req: Request, res: Response) => {
    try {
        const { _id } = req.params;
        const response = await deleteOneProduct({ _id });
        res.status(200).json(response);
    } catch (error) {
        res.status(500).json(error)
    }
}
On observing, every controller function contains another function inside it and the inner functions were imported from a helper file. Here I say the inner functions as helper functions. Actually, the helper functions were directly connected to the MongoDB with mongoose Object-Relational Mapping (ORM). And the structure of the helper function and DB connection is given below
import mongoose from "mongoose";
export async function initializeDb() {
    try {
        mongoose.Promise = global.Promise;
        await mongoose.connect("mongodb+srv://username:password@cluster0.1zkgd.mongodb.net/Project1?retryWrites=true&w=majority");
    } catch (error: any) {
        console.error(error.message);
    }
}
We briefly discussed ORM above, but Object Relational Mapping (ORM) is a technique that creates a layer between the language and the database that allows programmers to work with data without the OOP paradigm.
Schema and interface are used to define the properties and behavior of the DB collection and the essential requirement of each details of collection data.
The schema of the product collection should seem like this:
import mongoose, { Schema } from "mongoose";
import { IProduct } from "../interfaces/product";
const productSchema: Schema = new Schema({
    productName: { type: String, required: [true, "can't be blank"] },
    productCount: { type: String, required: [true, "can't be blank"] }
}, { timestamps: true });
export const Product = mongoose.model<IProduct>("products", productSchema);
In the above figure at line number 7 the mongoose model is declared as a type of Iproduct and this IProduct is imported from another file. The mentioned IProduct is an interface class of Product and it here acts as a data type.
The IProduct interface will seem like
export interface IProduct {
    _id: string,
    productName: string,
    productCount: string
}
By introducing the interface class as a mongoose model will always return results for every query in the interface structure.
By usage of the mongoose functions, the application can interact with the MongoDB. The actions will work as per calling it from the controller function. Here we finished a simple crud application in typescript.
Now we are stepping into the next step of our target.
Introducing the development of unit testing using mocha and chai
Testing is common software engineering that helps to document the core functionality of a code and the reconstruction of an existing code into a new one without introducing any breaking changes. In dealing with the developing session the testing part restricts the compromising nature and put a strict following of the assumptions, expectations, and observed results of a function.
Next, run unit tests for your application (unit testing is a software development process that tests the smallest testable portion of your application). Each API controller is considered as a unit segment of the application.
Two frameworks are used for targeted component testing, Mocha and Chai. Mocha is a testing framework in which functions are executed in a specific order and results are logged to a terminal window. chai is an assertion library commonly used with mocha. It supports functions and methods that help you to compare the output of a particular test and its expected values. Chai provides a clean syntax that reads almost like English.
Instead of knowing about unit tests, you only need to know the word assertion. An assertion is a confident and strong statement of fact or something. Here chai is an assertion library, so it means that chai contains several assertion properties that are used to justify the requirement behind writing a script let of code.
Now jump into the developing unit test code for documenting the APIs with respect to its expectation and observed results. First, we concentrate on the get method,
import chai from "chai";
import chaiHttp from "chai-http";
import { expect } from "chai";
import app from "../app";
chai.use(chaiHttp);

describe("GET request to /api/product", async () => {
    it("Should return a array of produts", (done) => {
        chai.request(app).get("/api/products").end((err, response) => {
            // chai assertion interface :- expect
            expect(response).to.be.json;
            expect(response).have.status(200);
            expect(response.status).to.be.equal(200);
            expect(response.body).to.be.a("array");
            expect(response.body[0]).to.have.property('_id');
            if (err) return done(err);
            done();
        })
    }).timeout(10000);
});
Imported the required dependencies, and also the app from the app.ts file. In describing the code in the above figure, “describe” and “it” functions were a part of the mocha framework. On compiling the describe part will be highlighted and also there is more than one “it” condition in a describe function. In fact, the chance of positive and negative sides (when an error occurs) is probably higher so the describe function will contain at least two “it” functions. On Diving into the code, line number 9 to 18 have been a part of chai. This section of code validates and values the API response and the conditions that satisfy the assertions which are written in it. If any of the assertions fails the failed condition will display the actual and expected response as an error message.
For evaluating and observing an API, first we should know about the request url and then the response from that API.In the above-mentioned figure its clear at line number 9. The request function of the chai framework works the app and sends a GET method API. At the end of an API call usually, we get either a success response or an error so here we pass both error and response in the end function, and also the end function can hold up with a time limit as we wish. Here is a timeout() of 10000 milliseconds on the end function. That means the end function will return any response only after the time.
Saying about the chai assertions, mainly 3 chai assertions methods using widely in uni testing
- Expect
- Should and
- Assert
Expect and should methods commonly follow BDD and Assert follows TDD methods, Here we are using Expect assertion for unit testing of each API.
As demanding and states the API response behavior, the response looks like JSON format and must contain certain properties also with a status code of 200 likewise the verbal sentences, the unit testing assertion statement line can be constructed.
Some linking chain getters in chai assertion are given below. These chainable getters improve your code readability.
- to
- be
- been
- is
- that
- which
- and
- has
- have
- with
- at
- of
- same
- but
- does
- still
- also
Hope you have been understanding their basics now it’s time to move on to the code development of unit testing of POST API. For simplicity and easy learning, here and the rest of the API testing is also going to be built in expect interface of chai.
import { Product } from "../schemas/products.schema"

describe("POST request to /api/products", async () => {
    it("Should return a array of one produts", (done) => {
        const testProduct = {
            "productName": "dummy1",
            "productCount": 100
        };
        chai.request(app).post("/api/products").send(testProduct).end((err, response) => {
            // chai assertion interface :- expect
            expect(response).to.be.json;
            expect(response).have.status(200);
            expect(response.body).to.have.property('_id');
            if (err) return done(err);
            done();
        })
    }).timeout(30000);
    it("Should return error message", (done) => {
        const testProduct = {
            "productName": "dummy1",
        };
        chai.request(app).post("/api/products").send(testProduct).end((err, response) => {
            // chai assertion interface :- expect
            expect(response).to.be.json;
            expect(response).have.status(500);
            if (err) return done(err);
            done();
        })
    }).timeout(30000);
});
Used the dummy data to check the API response and the case of error occurrence. In this section, I have imported a product instance from the product. schema file.
Handling the negative result case is also added as an embedded secondary function, as we see the dummy data hasn’t contained sufficient data in it. So as we expected, the service function will return an error message with the status code of 500.The PUT and DELETE API unit testing snippet is shown below.
describe("PUT request to /api/products/:id", async () => {
    it("Should return a array of one produts", (done) => {
        const mongoID = "62d3f3c4b7bd570a6cd4089b";
        const updateProduct = {
            "productName": "dummyOne",
        }
        chai.request(app).put(`/api/products/${mongoID}`).send(updateProduct).end((err, response) => {
            // chai assertion interface :- expect
            expect(response).to.be.json;
            expect(response).have.status(200);
            expect(response.body).to.have.property('_id');
            if (err) return done(err);
            done();
        })
    }).timeout(10000);
    it("Should return error mesage", (done) => {
        const mongoID = "12345";
        const updateProduct = {
            "productName": "dummyOne",
        }
        chai.request(app).put(`/api/products/${mongoID}`).send(updateProduct).end((err, response) => {
            // chai assertion interface :- expect
            expect(response).to.be.json;
            expect(response).have.status(500);
            if (err) return done(err);
            done();
        })
    }).timeout(10000);
});

describe("DELETE request to /api/products/:id", async () => {
    it("Should return a array of one produts", (done) => {
        const testProduct = new Product({
            "productName": "dummy",
            "productCount": 100
        });
        testProduct.save();
        chai.request(app).delete(`/api/products/${testProduct._id}`).end((err, response) => {
            // chai assertion interface :- expect
            expect(response).to.be.json;
            expect(response).have.status(200);
            expect(response.body).to.have.property('_id');
            if (err) return done(err);
            done();
        })
    }).timeout(30000);
    it("Should return error message", (done) => {
        const testProductId = "12345"
        chai.request(app).delete(`/api/products/${testProductId}`).end((err, response) => {
            // chai assertion interface :- expect
            expect(response).to.be.json;
            expect(response).have.status(500);
            if (err) return done(err);
            done();
        })
    }).timeout(30000);
});
Concluding the coding part of unit testing is here. For generating the test coverage report, here we use the nyc package, and it needs to run an npm command to build the report. Usage of “@istanbuljs/nyc-config-typescript” package and adding its essential properties in package .json makes our target much easier and the changes in package.json file is given below.
{
  "name": "project1",
  "version": "1.0.0",
  "description": "",
  "main": "index.js",


  "scripts": {
    "start": "node dist/app",
    "prestart": "npm run build",
    "build": "tsc",
    "test": "ts-mocha 'src/test/**/*.ts' --exit",
    "test:coverage": "nyc npm run test"
  },
  "nyc": {
    "extends": "@istanbuljs/nyc-config-typescript",
    "check-coverage": true,
    "all": true,
    "include": [
      "src/**/*.[tj]s?(x)"
    ],
    "reporter": [
      "html",
      "lcov",
      "text",
      "text-summary"
    ],
    "exclude": [
      "src/database/**/*.*",
      "src/interfaces/**/*.*",
      "src/routes/**/*.*",
      "src/schemas/**/*.*",
      "src/services/**/*.*",
      "src/app.ts",
      "src/test/**/*.*"
    ],
    "lines": 50,
    "report-dir": ".nyc_coverage"
  },

  "keywords": [],
  "author": "",
  "license": "ISC",
  "dependencies": {
    "body-parser": "^1.20.0",
    "chai": "^4.3.6",
    "chai-http": "^4.3.0",
    "express": "^4.18.1",
    "mocha": "^10.0.0",
    "mongoose": "^6.4.1",
    "nock": "^13.2.8",
    "ts-mocha": "^10.0.0",
    "typescript": "4.7.4"
  },

  "devDependencies": {
    "@istanbuljs/nyc-config-typescript": "^1.0.2",
    "@types/chai": "^4.3.1",
    "@types/express": "^4.17.13",
    "@types/mocha": "^9.1.1",
    "nyc": "^15.1.0"
  }

}
now we have to set up the package.json file to run these codes and see the result of what we have done yet.
npm run test:coverageRun the above command in the terminal and it shows the result like:
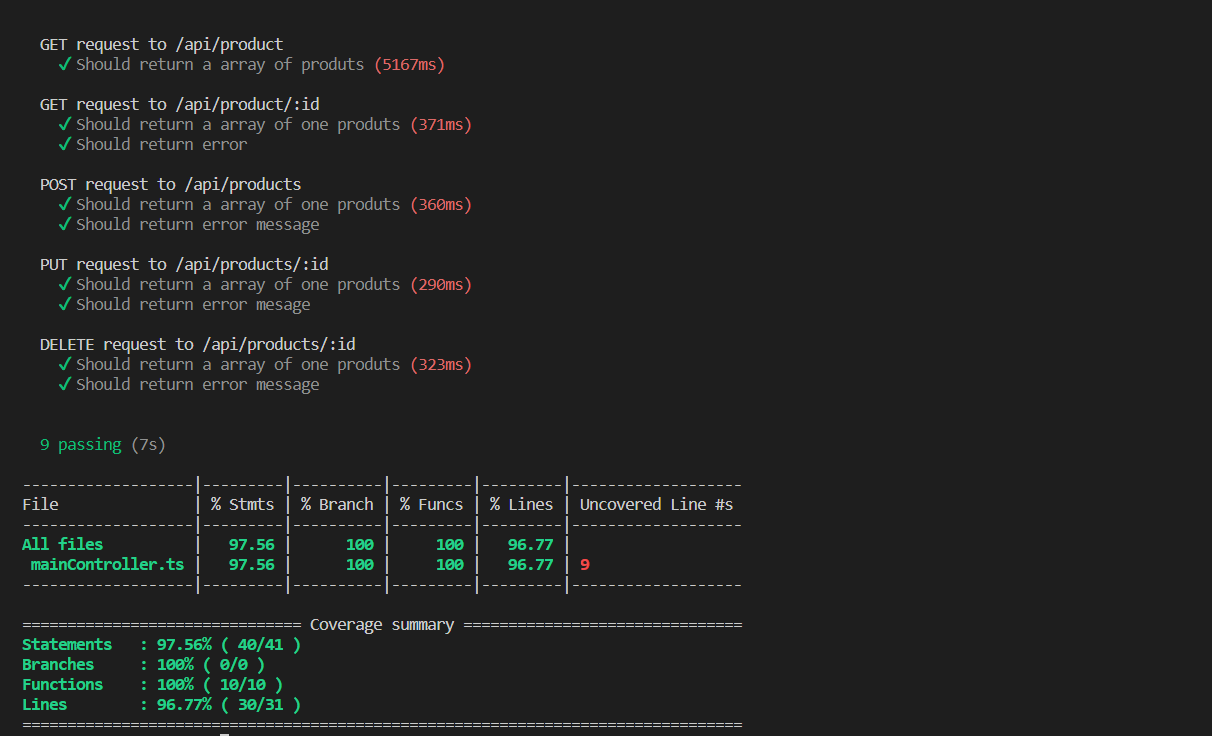
By running the test coverage report generating command ,we will get a folder named as “.nyc-coverage” inside the project folder itself and it contains an index.html file that shows the report based on our unit testing. Now we got the report as


In case any of the lines in the code that we missed or the line not considered in the unit testing, it will be highlighted in the test report as shown in the above figure. This NYC coverage will help to find out the parts which we have forgotten while writing the unit testing.
Hope that these things will be captured in your mind and also this journal will be helpful to you in your development career. For more reference, you can check the code on GitHub and the link is :
Have a nice day and thank you.
Leave a Reply