
TypeScript is a JavaScript superset that provides some additional syntax for defining types. For a better programming experience, we can discuss and understand the typescript and node here.
What is Typescript and why you should start using it?
TypeScript is a strongly typed, object-oriented, compiled language maintained and developed by Anders Hejlsberg at Microsoft, it’s used by lots of software developers around the world. TypeScript is a language and a set of tools at a time. TypeScript may be a typed superset of JavaScript compiled to JavaScript. In other words, TypeScript is JavaScript and some additional features.
Type system code enhances quality and readability and makes the codebase easier to maintain and refactor. Most importantly, errors can be detected during compilation instead of runtime.
TypeScript detects errors during compilation, so you can fix the error before running the code. TypeScript supports object-oriented programming features such as data types, class, and enums, etc.
TypeScript compiles into simple JavaScript. The TypeScript compiler is also implemented in TypeScript and can be used with any browser or JavaScript engine like Node.js. TypeScript needs an ECMAScript 3 or higher compatible environment to compile. This is a condition met by all browsers and JavaScript engines today.
TypeScript codes are written in a file with .ts extension and then compiled into JavaScript using the TypeScript compiler. You need to have a TypeScript compiler installed on your platform. Once installed, the tsc <filename>.ts command compiles the TypeScript code into a plain JavaScript file. JavaScript files can then be embedded in HTML and run in any browser.
TypeScript supports the latest JavaScript features from ECMAScript 2015. This includes features from ES6 and ES7 that can run on ES5 level JavaScript engines such as Node.js. This offers the great advantage of using features from future JavaScript versions on current JavaScript engines.
TypeScript can be easily integrated with Task Runner tools such as Grunt and Gulp to automate workflow.
the following JavaScript code;
function firstWish(person) {
  return "Hello, " + person;
}
 let user = "Jane User";
 document.body.textContent = firstWish(user);
Tuple
TypeScript introducing a new data type call Tuple. Tuple can contain two values of various data types.
Check the following example
var userId: number = 1;
var userName: string = "Peter";

// Tuple type variable
var employee: [number, string] = [1, "Peter"];
In the above example, we have defined a variable userId as a number type and userName as a string type with values. Then, we declared and assigned two variables to the id and name of an employee. The same thing can be achieved with a single tuple type variable. The employee is a Tuple type variable with two values of number and string type.
Enum
In TypeScript, the Enum or enumerations are a new data type. The most Object-oriented programming languages like Java, C# use enums. This is now available in TypeScript.
Enums allows us to declare a set of constants named, i.e. a collection of corresponding values that can be numeric or string values.
There are three types of enums are available:
- Numeric enum
- String enum
- Heterogeneous enum
Numeric Enum
Numerical enums are number-based enums, which store string values in numbers. Enums can be defined using the Enum keyword. Let’s say we want to store a bunch of print media types. The associated enum in TypeScript would be:
enum NewsMedia {
Newspaper,
Newsletter,
Magazine,
Book
}
In the example above, we have an enum called NewsMedia. There are four values: newspaper, Newsletter, magazine, and book. Here, the enum values start from zero and increase by 1 per member. It will represent the following:
Newspaper = 0
Newsletter = 1
Magazine = 2
Book = 3
String Enums
String Enum is a similar concept, but with some subtle runtime differences as noted below. In a string enum, each member must literally start with one string or another string enum by default.
enum NewsMedia {
Newspaper = "Newspaper",
Newsletter = "Newsletter",
Magazine = "Magazine",
Book = "Book"
}
Although string enums do not have a self-incrementing nature, string enums have the advantage of “serializing” them. In other words, if you have debugged and read the runtime value of a numeric enumeration, the value is often opaque – although this in itself does not convey any useful meaning (although reverse mapping is often helpful), string enumerators allow you to enter a meaningful and readable value in the name of your code as it exists.
Heterogeneous Enums
Technically enums can be combined with string and numeric members, but it is not clear if you ever want to do so:
enum BooleanLikeHeterogeneousEnum {
  No = 0,
  Yes = "YES",
}
If you are not really trying to make wise use of JavaScript’s runtime behavior, I suggest you do not do this.
Interfaces
The interface is a syntax that an entity must obey. In other words, an interface defines the syntax that any entity must comply with.
Interfaces define the properties, methods, and events that are members of the interface. Interfaces contain only the declaration of members. it’s the responsibility of the deriving class to define the members. This often helps to supply a basic structure for pursuing deriving classes.
The interface keyword is used to declare an interface. Here is the syntax for declaring an interface –
interface IUser {
  firstName:string,
  lastName:string,
  sayHi: ()=>string
}
Interfaces should not be converted to JavaScript. This is only a part of TypeScript. Unlike a class, JavaScript does not emit when you declare an interface. So the interfaces have zero runtime JavaScript impact.
String Literal Types
The expected value of the string literal type is a string with text content equal to the string literal type.
Here are some examples of how to use string literal types:
const eventName1: "click" = "click"; // OK
const eventName2: "click" = null; // OK
const eventName3: "click" = undefined; // OK

// Error: Type '"mouseover"' is not assignable to type '"click"'.
const eventName4: "click" = "mouseover";

// Error: Type '""' is not assignable to type '"click"'. const eventName5: "click" = "";
Numeric Literal Types
Typescript has numeric literals, which are similar to the string literals above.
let x: "hello" = "hello";
// OK
x = "hello";
// ...
x = "Hi";
// '"Hi"' is not assignable to type '"hello"'
Project Structure / Folder Hierarchy
The most obvious difference within the TypeScript + Node project is that the folder structure. during a typewriter project, it’s best to possess separate source and distributable files. TypeScript (.ts) files are sleep in your src folder, then output as JavaScript (.js) within the dist folder. The test and views folders are as high needless to say.
Initial setup
Let’s create a folder for us to work in.
mkdir typescript-starter
cd typescript-starter
Next, we’ll set up the project package.json and add the dependencies.
Setup Node.js package.json
Using the flag when creating a package.json will simply approve all the defaults.
npm init -yAdd TypeScript as a dev dependency
TypeScript installation command;
npm install typescript --save-devAfter installing, we get access to the command line TypeScript compiler through the tsc command. More on that below.
Project structure;
├── node_modules/
├── src/
  ├── app.ts
├── package-lock.json
├── package.json
├── tsconfig.json
├── tslint.json
Now we can compile it to JavaScript using tsc command in the terminal. Let’s do it!
Assuming that our file is named example.ts, the command would look like this:
tsc example.tsThis command will result in a new file called example.js which we can run with Node.js. Now that you know how to compile and run TypeScript code, you can see Typescript bug-blocking capabilities in action!
Developer Friendly
- to help understand the goal of Typescript as an alternative to Javascript.
- to utilize capabilities of Typescript to write typesafe Javascript.
- speed up the event with the assistance of higher support in IDEs (Visual Studio 2013, Sublime Text 3).
- increase the maintainability of the project by modularizing code.
Watching for Changes
ts-node-dev | ts-node-dev – npm (npmjs.com) Write something on this. Refer to their page. Don’t go much deep into it
Debugging with Source map
TypeScript debugging is supported the JavaScript source maps. To create source maps for your typescript files, compile with the --sourcemap option or set the Sourcemap property to True in the tsconfig.json file.
In-line source maps (a source map that stores content as data URLs instead of a specific file) are supported, although the in-line source is not yet supported.
For a simple example of working source maps, see the Typescript tutorial, which shows how to debug a simple “Hello World” node application using the following tsconfig.json, VS code default Node.js debugging configuration.
{
   "compilerOptions": {
     "target": "es5",
     "module": "commonjs",
     "outDir": "out",
     "sourceMap": true
    }
 }
Express/Typescript Boilerplate
- This boilerplate is built using the Express.js web framework and uses Typescript language to write the logic of the application.
- A perfect way to build Node.js RESTful API services using beautiful code written in typeScript.
- It uses the Node Cluster API, which enables us to utilize multicore systems and manage loads.
Why we need this Boilerplate?
1. Exception Handling
The exception handling refers to the mechanism by which the exceptions occurring during a code while an application is running are handled.
To handle the exception – the repo consists of two classes, ie. Handler and NativeEvent.
2. Fork a new cluster when exiting the old cluster
It uses the Node Cluster API, which enables us to utilize multicore systems and manage loads. Instead of sending the entire load to a single core / CPU, try to utilize a multi-core system to handle the load. Here, if the cluster dies for some reason, we immediately create a new one/fork.
3. Authentication (using email or social accounts)
For Route Authentication middleware – web routes are configured with the CSRF token, and API routes are configured with the JSON web token.
By using Passport JS as an interface, we add configurations and register them in the application for social authentication. Strategies Authentication – Repo contains the use of Passport.js. Passport.Js is compatible with Express.Js and is the authentication middleware for Node.Js.
4. Logger
A single log class with methods such as info, warning, error, and customization. These methods send a log string to a file under the .log directory of your project root and continue to create these log files daily without a single log file.
For logging – Repo uses the custom log class built-in middleware folder, which creates the log file by date and deletes the log files after the ‘X’ day (you can define ‘X’ in the .env file).
5. DotEvn
Use .env to load environment variables / constants throughout the application. Now, we have a centrally stable position. The DotEnv package is used to store custom default configurations in process.env.
6. Tokens
We want to use CSRF tokens for our web routes and JWT tokens for API routes. So, we create middleware for the two tokens and register them on the web and API routes, respectively.
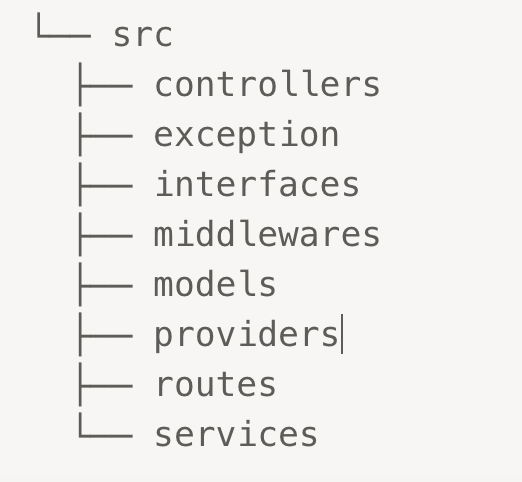
7. Structure
There was a discussion about setting up folders/files in Express JS. It is difficult to establish where to organize and what files to organize, or if even a perfect structure could have been achieved.
Finally, I came up with the following folder structure.
8. Queues
There are various things in a backend logic that do not really need to happen in response to a request such as sending emails or SMS texts. In short, things that require a connection to any third-party service are overhead in some respects
For background queues – Repo contains the use of Kue. For more information, see Queue Class Review.
9. Cache
To cache web routes, I used a simple in-memory cache with a memory -cache.
GitHub Link: https://github.com/harsha-p-zweck/typescript-node.js-stater
Conclusion
I hope this article removes the fear of typing scripts to get started in the Node.js Express application. In this tutorial, you will learn why Typescript is useful for writing reliable JavaScript code. You also learned about some of the benefits of working with Typescript.
Leave a Reply